


How to Assemble Your Bed | Step-by-Step Guides
Follow our detailed, illustrated assembly instructions for your British Furniture Shop bed. Select your bed type below to get started.
Divan Bed Assembly Instructions
-
 1
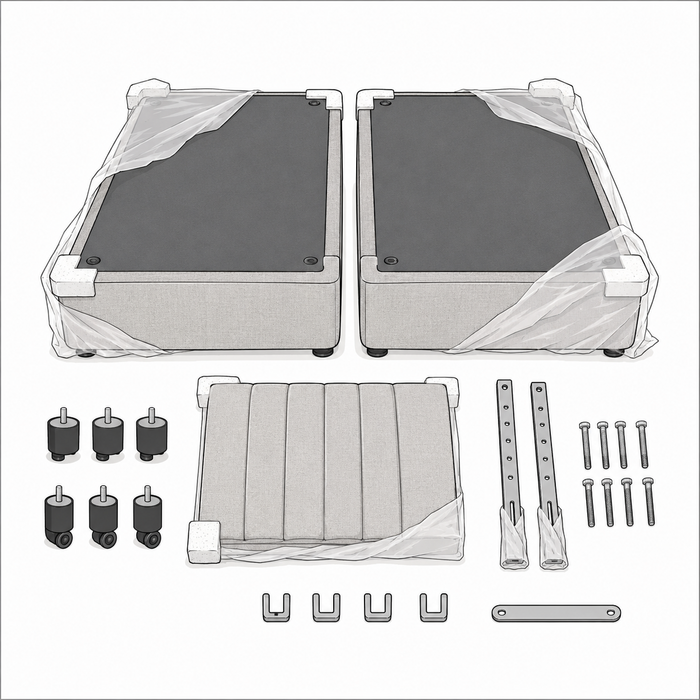
1Unpack and check your parts
Remove all packaging carefully to avoid marking the fabric. You should have two base sections (or one for smaller sizes), feet or castors, headboard bolts and struts if you ordered a headboard, and U-clips or a linking bar to join the bases together.
-
 2
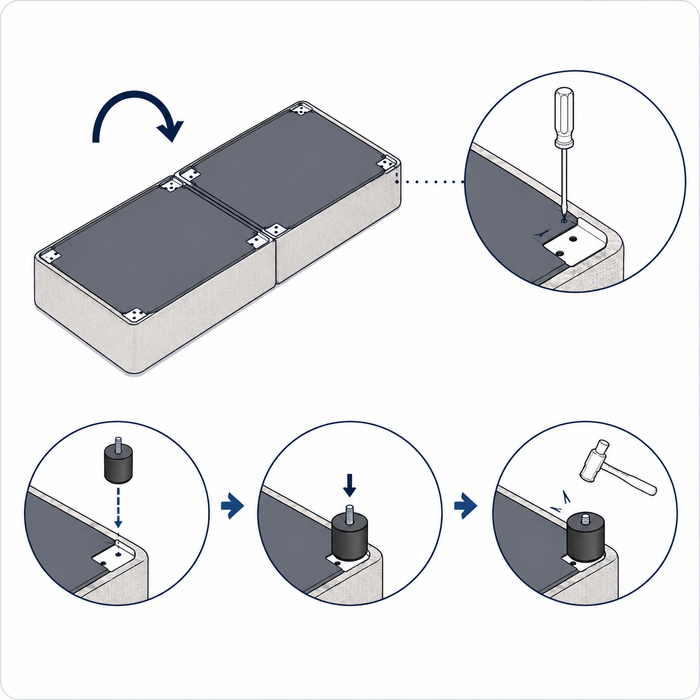
2Fit the feet
Turn each base section upside down. Locate the pre-drilled holes at each corner. If fabric is covering the holes, gently puncture through with your screwdriver. Push the feet into place and tap gently until secure.
-
 3
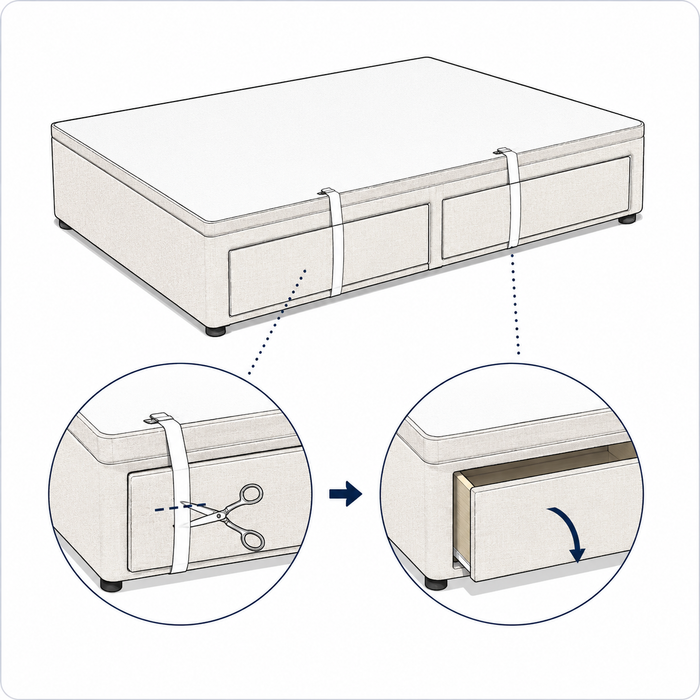
3Remove the drawer straps
If your divan has storage drawers, fabric straps will be holding them shut for transit. Cut these away carefully with scissors, taking care not to damage the drawer fronts. Maximum drawer weight is 15kg, so please don't overload them.
-
 4
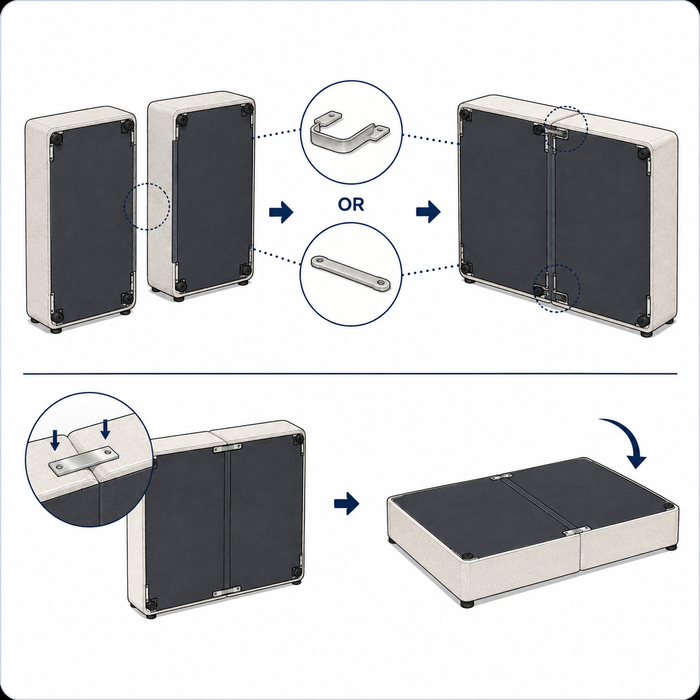
4Join the two base sections
Stand both base sections upright, flat edges together. Fit the U-clips or linking bar at the top and bottom of the join to secure the two halves. Once fitted, carefully lower the joined base flat onto its feet.
-
 5
5Attach your headboard
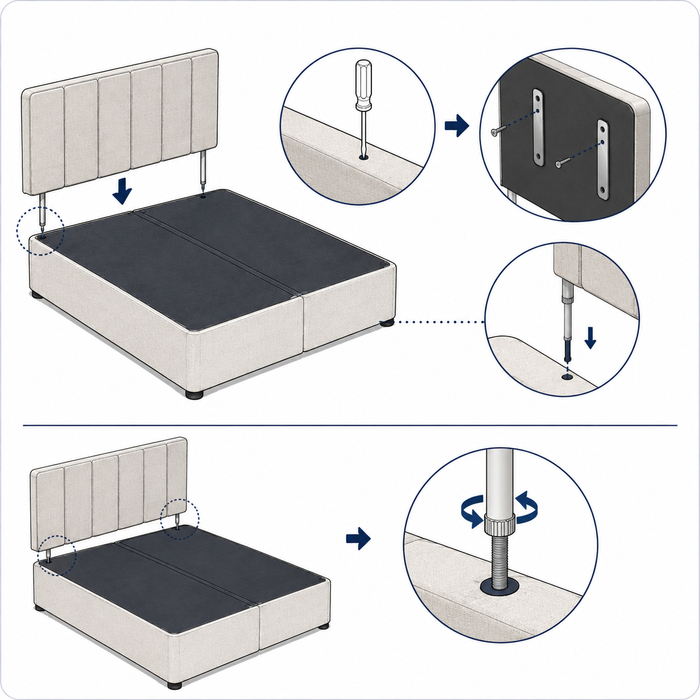
Decide which end of the bed will hold the headboard. Locate the fixing holes at the head end, puncturing the fabric if needed. If your headboard uses struts, screw these to the back of the headboard first. Line up the headboard bolts with the base and tighten by hand until secure.
-
 6
6Add your mattress
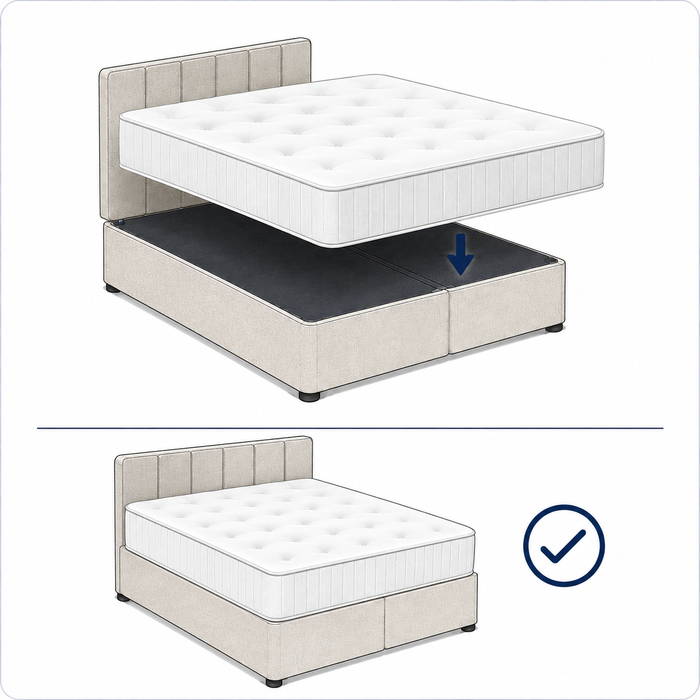
Your divan base is now ready. Simply place your mattress on top and you're all set.
Ottoman Divan Bed Assembly Instructions
-
 1
1Unpack and check your parts
You should have your ottoman base, gas-lift piston(s), feet, and headboard fixings if ordered. Check everything against your parts list before starting.
-
 2
2Fit the feet
With the base upside down, locate the pre-drilled holes at each corner and push the feet into place, tapping gently to secure.
-
 3
3Fit the gas-lift mechanism
Turn the base the right way up. Align the gas-lift piston(s) with the fixing points inside the ottoman frame, following the marked positions. Secure using the bolts provided. This mechanism allows the base to lift smoothly for storage access, so make sure it's firmly fitted before use.
-
 4
4Attach the headboard
Locate the fixing points at the rear of the ottoman frame, puncturing the fabric if needed to reach the screw fixtures. If your headboard has struts, attach these first using the screws provided, then secure the headboard to the base. Spacer blocks may be needed depending on your mattress depth; these will be included if required.
-
 5
5Attach the footboard
Align the footboard brackets with the pre-installed brackets on the frame and slide into position until secure.
-
 6
6Test the lift mechanism
Before adding your mattress, gently lift the base to check the gas-lift pistons are working smoothly and holding the base securely in the open position.
-
 7
7Add your mattress
Once you're happy the lift mechanism is secure, add your mattress and your ottoman bed is ready to use.


Standard Bed Frame Assembly Instructions
-
 1
1Unpack and lay out your parts
Assemble in the room where the bed will stay, ideally on a soft surface like a blanket to protect the frame from scratches. Check all parts, headboard, footboard, side rails, slats and hardware, against your parts list before starting.
-
 2
2Connect the side rails to the headboard
Align the side rails with the headboard fixing points and secure using the bolts provided. Tighten by hand first, fully tightening once all bolts are in place and aligned correctly.
-
 3
3Attach the footboard
Connect the footboard to the opposite ends of the side rails in the same way, creating a rectangular frame. Check the frame is square by measuring both diagonals; they should match.
-
 4
4Fit the centre support
Larger frames include a centre support beam or legs running down the middle of the bed to prevent sagging. Secure this according to the fixing points on your model before adding the slats. Required for double, king and super king sizes.
-
 5
5Install the slats
Lay the slats evenly across the frame, resting on the internal ledges of the side rails or the centre support. Secure with the fixings provided if your model requires this; some slats simply rest in place.
-
 6
6Final check
Give the frame a gentle shake to check for stability. Retighten any bolts if needed. Your frame is now ready for your mattress.


Standard Ottoman Bed Assembly Instructions
-
 1
1Unpack and lay out your parts
Assemble in the room where the bed will stay, ideally on a soft surface like a blanket to protect the frame from scratches. Check all parts, headboard, footboard, side panels, base platform, gas-lift piston(s) and hardware, against your parts list before starting.
-
 2
2Build the outer frame
Connect the side panels to the headboard using the bolts provided, tightening by hand first. Attach the footboard to the opposite ends of the side panels in the same way, creating the rectangular outer frame. Check the frame is square by measuring both diagonals; they should match.
-
 3
3Fit the ottoman base platform
Lower the hinged base platform into the frame, aligning the hinge brackets at the foot end with the fixing points on the frame. Secure with the bolts provided, making sure the hinge moves freely before continuing.
-
 4
4Fit the gas-lift mechanism
Align the gas-lift piston(s) with the fixing points between the base platform and the frame, following the marked positions. Secure using the bolts provided. This mechanism allows the base to lift smoothly for storage access, so make sure it's firmly fitted and moves freely before use.
-
 5
5Attach the headboard cover panel
If your headboard is upholstered separately from the frame, secure it to the headboard posts using the fixings provided, checking it sits flush and level.
-
 6
6Test the lift mechanism
Before adding your mattress, gently lift the base platform to check the gas-lift pistons are working smoothly and holding the base securely in the open position. Lower slowly to confirm it closes evenly.
-
 7
7Final check
Give the frame a gentle shake to check for stability and retighten any bolts if needed. Confirm the base platform sits flat and level when closed.
-
 8
8Add your mattress
Once you're happy the frame is stable and the lift mechanism is secure, add your mattress and your standard ottoman bed is ready to use.


